DigitalPro Shooter Volume 3, Issue 10, November 7, 2005
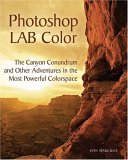
In this issue we've got a complete review if the exciting new color
correction book from Dan Margulis,
Photoshop LAB Color, as well as info on some great new products that
have been introduced just in time for Christmas. In particular, check out
http://www.nikondigital.org for
the Nikon D200 specs. We've also still got a couple slots for our second
Grizzly Bear & Puffin week in July 2006, so
sign up soon.
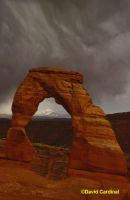
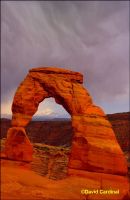
The Photoshop LAB Book: The Canyon ConundrumCould you fix the image on the left of Delicate Arch?
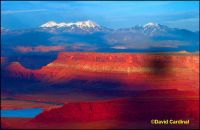
After reading the book (or more honestly flipping through for the tidbits I could quickly understand) I was able to re-process this image and the others shown below in only a couple of minutes each and produce results that were superior to what I'd accomplished previously with oodles of layers, masks and fiddling. What fun! A more thorough reading revealed a whole new world of color correction opportunities using the very powerful LAB colorspace. The Magic of LABAs someone fascinated by the way human vision works, I've always been interested in the LAB colorspace. For those not familiar with LAB, it is a representation of color that separates the luminance (overall brightness or "lightness") or "L" channel from the color channels--"A" and "B". While we most often think of the human visual system as being RGB, it also relies heavily on the contrast between Red and Green and Blue and Yellow. Not by coincidence, those are the A and B channels in LAB. The result is a very powerful colorspace that can cause dramatic changes in our perception of an image by creating and destroying contrast easily and quickly. And by having the L channel separate from colors it is possible to do operations including sharpening without accidentally adding color casts.
Amplifying Color
The obvious tools for doing this, Hue/Saturation and Curves, for example,
both have limitations. Increasing saturation can quickly lead to an
artificial look and destroy detail--turning your image into vistas of unreal
saturated blotches. Curves is also a difficult tool to use--in RGB at
least--to really enhance color.
Dan shows us how many images which are a problem in RGB can be enhanced
(corrected if you prefer) easily in LAB. Because the Luminance is
separated from the Magenta/Green and Yellow/Blue channels you can greatly
increase color contrast using the "a" and "b" curves without destroying the
detail carried by the luminance of the image. The book takes you through it
all step by step, with plenty of examples and alternatives, but one key
piece I took away is the technique of doing this with a curves layer that is
"overkill" and then adjusting the Opacity slider to taste.
Tone Mapping
Short of having the ZoneMapper from LightCrafts' new LightZone product,
Dan's technique for re-mapping tones using LAB is about the best I've seen
using Photoshop. Because the "L" channel has only luminance you are truly
remapping only the lightness tones without affecting colors. As always, Dan
gives you point by point instructions on how this works, how to apply it to
different kinds of images, and advice on when it might not work or might not
be worth the trouble.
The only real downside to this approach, and also to doing your color
correction in LAB, is that Photoshop doesn't allow you to mix and match
editing paradigms. So you need to convert the image to LAB, do your
corrections, then flatten it when you convert back to RGB for the rest of
your processing and printing. I don't see any scientific or technical reason
that a future version of Photoshop couldn't accommodate a mixed mode where
LAB type corrections would be possible interspersed with RGB corrections.
After all, the image doesn't really care what space we are looking at it
through. That could be accomplished by having mixed RGB & LAB layers or by
rethinking the Photoshop editing paradigm to allow commands that transcend
the current colorspace. Until then though we'll need to keep flopping
between spaces to use the power of these techniques.
Other Goodies
--David Cardinal, Editor, DigitalPro Shooter New ProductsFirst and foremost, Nikon has announced the D200, an 18-200 VR lens and a whole new macro flash setup. Read the details on our homepage: http://www.nikondigital.org Intemos, makers of some excellent products for cleaning your digicam and sensor have produced a free downloadable sensor cleaning video. CompactDrive is shipping a portable hard drive + card reader combo that can also serve as a AA battery re-charger. The PD70X comes with or without an installed drive. Since the Epson P4000 isn't available yet, I was about to order a Nexto CF unit for an upcoming trip, but found the PD70X and am very intrigued by the combination of features for a portable hard drive (no viewing though, so it is not directly competitive with units like the Epson). At about $150 without hard drive (www.eastgear.com) it isn't too much more than a reader + drive case + battery charger and it is more versatile and more compact. For those who can wait, I'll post a more complete review after I've used the unit for a few weeks. Wimberly has delayed the Wimberly II head until December but is offering loaners to customers on the wait list who have critical shoots in the meantime. Maha has a new portable world charger for AA Batteries (MH-C204W) which is quite quick. One warning is that (like the D1X after the firmware upgrade) it is much pickier about which batteries it will recharge. If your batteries are at all worn out or have any internal defect it may report them as bad rather than recharging them. You can purchase it from Thomas Distributing.
DigitalPro TipAll you need to do to assign a keyword or category to an image in DigitalPro is check the box next to the category or keyword. Or you can drag images to the category or keyword. --David Cardinal, Editor, DigitalPro Shooter | |||||||||||
Search our Sites:
