Taming LAB with Curvemeister
As powerful as LAB is, using it does have one big problem--it creates a painful workflow because you need to convert to LAB, do your corrections, and then (typically after flattening) convert back to RGB (or to CMYK). Layers and their intent are lost and you spend a lot of time converting back and forth. Fortunately, after having written about this problem one of our readers, Mike Russell, the genius behind a very cool tool called CurveMeister, contacted me and explained that with CurveMeister you can use LAB curves right from RGB in Photoshop. This is incredibly helpful and saves tons of time..
Curveveister saves as much as minutes per image just because of this one feature. But it is packed full with lots of other productivity enhancements that make Curves--the most powerful command in Photoshop--much easier and faster to use. First, it offers a great large preview screen of your changes, which you can easily set to any channel. Second, it color codes the curves dialogs so that (for example) you can easily remember which end of the a & b channels are red, green, yellow or blue. Third, it provides a much larger and nicer window for actually manipulating the curves. Fourth, it has the ability to use or create "pushpins" which are memorized colors. Assigning a push-pin to a place in a photo pins that spot to a particular color. Finally, it is chock ful of other settings such as history that allow you to take Curves way beyond what is possible with Photoshop.
Part of my enthusiam for Curvemeister is necessity. I'm in the middle of creating a fairly large exhibition requiring over 40 large format prints. I want to have them all "match" so I've been reprocessing my existing TIFFs to maximize what I can get out of them and optimize them for the size and type of paper I'll be using. Of course this is a lot of work since I want to do each one by hand and check the results. The first thing I noticed is that for 2 out of 3 I could improve the color and the drama of the image using LAB. The second thing I realized is that it would take me days to do that fully manually. Curvemeister enables me to fairly quickly add a LAB curves layer to my existing images, preserving much of the rest of my work, and then quickly proceed to the final resizing, sharpening, and printing with ImagePrint.
Quick Color Enhancement using Curvemeister & LAB
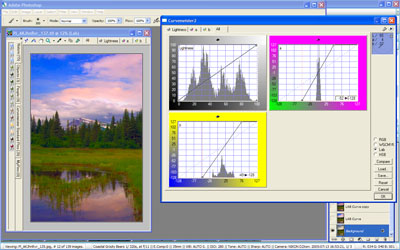
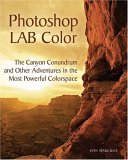
You really need to read Dan's new book on using the LAB colorspace to get the most out of LAB, but just to give you a taste of what is possible here is one of my quick "cookbook" approaches to enhancing the color in a digital capture, based on advice in Dan's book:

Curvemeister can be used to enhance color with a simple
LAB curve without switching to and from the LAB colorspace
|
Quick Color Enhancement using Curves & LAB:
- Make a copy of your background layer (CurveMeister can't be used as an adjustment layer. It will overwrite the top layer of your image, so you probably want to make sure it is a copy)
- Bring up CurveMeister and swtich it to LAB mode.
- Create some steep angles in the "a" (Red/Green) and "b" (Blue/Yellow) channels. See the attached screenshot for an example. Controlling the angle and shape of the two "curves" is the key to getting the best out of this technique, so feel free to experiment and/or read Dan's book.
- Your image will probably look quite gaudy now, but don't worry about that. Go ahead and Apply the Curve and then use the Opacity slider to control the effect. Back it down until you get the enhancement you want without your image looking un-real or too gaudy.
|
Correction or Enhancement: Where is the line?
Many discussions of photo-editing center on a debate about what changes are "permissible" to an image. Obviously a lot depends on the usage, but there is certainly some energy about determining which edits are "correcting" the image back to the "real scene" versus enhancing it beyond that. Frankly, the line is incredibly murky. Every person sees each scene differently, and the same is true for cameras. Working with our raw captures (whether they are film negatives or digital originals) is a time honored practice. The only difference is that we have increasingly powerful tools. The only guideline I have is a simple one: If you correct, edit or otherwise tweak an image until it looks "better" than the viewer imagines a "photograph" can, it will be judged in their mind as an artwork, rather than a pure photograph. That can set the bar quite high for how compelling it needs to be. But if you leave the image mostly alone then the viewer will tend to credit your photographic "craft" and think of the image as a photograph and judge it accordingly. So as you start to work on an image, think about what you want it to convey and who the audience is. Let me know your thoughts on this in our Digital Cafe forum.
New Products
Pro Printer Profiling for an affordable price: Colorvision is now shipping PrintFIX PRO, a serious price
performance breakthrough in printer profiling. At a list price of $499
PrintFIX PRO delivers profiles previously only attainable with multi-thousand
dollar systems. I've been using it for a couple months now and have been
printing "side by side" images from my PrintFIX PRO profiles and Gretag
ProfileMaker 4.1 (several thousand $$ with hardware) profiles and they
are neck and neck.
For any photographer who wants to get accurate color from their
printer I highly recommend PrintFIX PRO. I'm such a believer that we've made
special arrangements with ColorVision to get our readers a discounted
price on PrintFIX PRO and on Colorvision's other products. You can use this form to order a copy. PrintFIX PRO Suite includes everything you need for profiling your printer, monitor(s) and even your projector. At the list price of $699 it is definitely the best value in a complete, professional quality profiling solution, but our readers can get it at a special discounted price by using our subscriber order form. If you already have a monitor profiling package then you can get PrintFIX PRO only for less money instead and it will handle your printer profiling needs. If you only want to get started with profiling your monitor, then Spyder2 PRO will do the job nicely. You can also purchase it in a bundle with nik ColorEfx or with Adobe Elements 3--all at special subscriber discounts. Full Disclosure: Clearly we are now re-selling PrintFIX PRO, so I
have a bias, but we weren't when I beta tested and reviewed it. It was
just plain impressive enough that we decided to add it to our very short list
of affiliated products (along with
PhotoRescue).

|
Camera GPS from Red Hen Systems has introduced a very cool new tool for D2X and D200 owners. It is a tiny GPS that fits in your hot shoe and allows you to record photo locations in your image metadata. I have been using one for several months and it is very slick. It makes it easier than ever for me to log great shooting locations, bird nests, or other locations I want to map with my photos. I was able to use the Red Hen D2X-GPS tagged images plus Google Earth to make a map of our African safar camps, for example. If you're interested in learning more about what you can do with GPS information and your images, read my article Location, Location, Location in PC Magazine online. The D2X-GPS is available directly from Red Hen Systems for $395 and will fit either a Garmin Gecko 201 or Gecko 301 GPS unit. |
Nikon's R1C1 Macro Flash system is shipping. It includes an all new wireless flash controller and all new macro flash heads--which can be used on the lens ring mount or separately on the provided stands or clamped to something. For the first time digital shooters can now have real TTL macro flash. I'm incredibly excited just looking at mine in the box, but frankly have been too swamped to do much more than that. But for lots more info, check out Moose's review to see why he likes it so much.
|
DigitalPro Tip
DigitalPro 4.0.3 update for Windows image browsing & cataloging software has just been released,
adding support for Lexar stackable readers. Now you can load multiple cards
in Lexar Pro readers with a single click! You can
learn more or download it
here. Didi you know that DigitalPro 4 allows you to see the GPS information in your image and will map it for you if you're in the US and connected to the web.
Special Guest: Mike Russell, author of Curvemeister has agreed to write an article for us on how to make the most out of Photoshop curves--and he knows as much about them as anyone. So look for it on
nikondigital.org and in a future issue of DigitalPro Shooter.
--David Cardinal, Editor, DigitalPro Shooter
Subscribe to:
DigitalPro Shooter,
the nikondigital.org newsletter! |
|
|
|
 All contents copyright Pro Shooters LLC. All rights reserved.
Nikon is a trademark of Nikon Corporation.
nikondigital.org is not affiliated with Nikon Corporation.


