The Coolpix 5000 - Too cool for most!--Moose Peterson
The Coolpix 5000 Layout
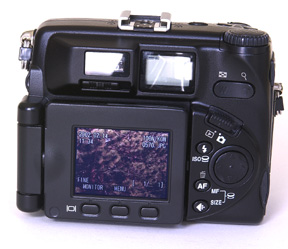
On the front of the CP5000 to the left of the lens and within easy reach of your right index finger is the AE-L/AF-L button. This provides you auto-exposure and auto-focus lock ability. (Be really careful when holding the camera not to accidentally cover the sensors on the front.)
The ISO/Flash button has a dual role. By depressing the button and rotating the thumb dial, you can select ISO 100, 200, 400, 800 or Auto (I personally use ISO 100). If you depress the same button over and over again, you can cycle through the many flash modes available on the CP5000. If you're in Continuous Shooting mode though, the built-in flash doesn't work at all, you must use an auxiliary flash. Same thing if you preset the CP5000 to activate in a certain zoom mode.
The SIZE/MF button permits you to set the camera to either Basic, Normal or Fine shooting modes. This is done by simply depressing the button a number of times and cycling through the options. If you depress the button and rotate the thumb dial, then you can change the size captured for each of the Basic, Normal or Fine settings. You have the options of 2560, 1600, 1280, 1024, 640 for each of the files settings. I personally have my CP5000 set to Fine / 2560. (There is a mode for "cropping" the image to 35mm proportions that is also 2560 in the small LCD. You'll know when that is selected only by the slow blinking green light to the left of the viewfinder.) The last obvious part of the CP5000 layout is the ISO Hot Shoe. It's really nice that the built-in flash is above the lens and not to the side, but it's still a small, built-in flash. I personally use the SB-50DX with the CP5000 and man, does that work like a charm! I go so far as to use the Sto-Fen (www.stofen.com) Omni Bounce on it, it's killer! With the CP5000 set to Continuous Shooting mode, attaching an external flash is the only way you can once again do flash photography. The Monitor
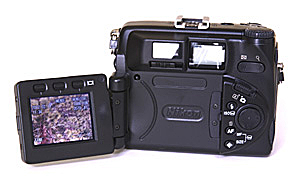
When I'm setting various functions and settings on the CP5000 or showing images I've taken to others, I will quickly and easily flip the monitor around. The monitor of the CP5000 does a better job of displaying accurately what you've captured than the monitor on earlier Coolpix models. Composition, exposure and color are all displayed rather faithfully which is a nice enhancement.
Probably the monitor (besides the hot shoe) is the only real external part of the Coolpix 5000 that might make the serious SLR digital shooter stop and take notice and consider the camera more than a pocket digital camera. But there's more to entice you! (Note, when you open the monitor, certain features/functions change. Be sure to consult your IB for more info.) Various Coolpix 5000 Settings The instruction book for the CP5000 is pretty darn extensive with some pretty well written explanations. And there are simply one heck of a lot of marvelous features in the CP5000, more than I've played with or have the time to write about. I'm going to provide you some info on some that I've found that make the camera work best for me.
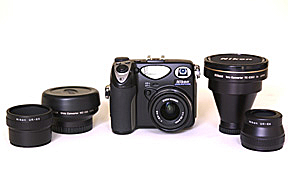
I have everything set under User Set 1. This permits me to set the camera to Aperture Priority, Matrix Metering, Cloudy -3 (yes, you can set the color just like on the D1/X/H), Fine, Zoom Option-off, Seq. Numbers-on, Auto Off-5M (I have extra batteries.did you know you can get a handgrip/battery pack for the CP5000?). There are a lot more options, but these are the basic ones I use on a daily basis. Mentioning these few settings is really selling the CP5000 short! There is a lot more you can do with this camera. One little thing you should be aware of. If you have the white balance set to Cloudy, the built-in flash will not properly expose the scene. You need to switch the color balance back to Sunny or Auto to get the built-in flash to work. The Coolpix 5000 has some cool settings that you might want to check out. One of the cool ones is the Noise Reduction setting. This actually has two options to it, both working to help reduce "dark" noise. I found that this works well--producing images that are better than what I can produce with the D1H of the same scene. Accessory Lenses The Coolpix 5000 has a number of accessory lenses you can add to make the camera more flexible. I have the 19mm and 3x telephoto. You have to have two different attaching tubes for these two lenses which is a slight pain. They look about as funky as you're going to find in photography. But man, do they deliver the quality! I am totally impressed in the image quality these lenses deliver! Image Quality Just like any television program, I'm leaving the most wanted info for last. Image quality, does the Coolpix 5000 with its 5 Megapixels deliver? If you're a pixel counter, you're saying to yourself, "heck, the D1 & D1H are only 2.66MP, the CP5000 must kick butt!" There are many elements that make up image quality in the digital realm, pixel count just one of them. I found the image quality of the Coolpix 5000 blows away the quality of any other pocket digital I've ever shot. I've already submitted images taken with the Coolpix 5000 for publication, did so without any hesitation! But many really wonder if the 5MP delivers more than the 2.66MP? There is no way you're going to see a difference in quality on your monitor or even the printed page between these. I made 8x & 11x prints taken by the CP5000 and D1H. Both cameras were on a tripod framing the same scene with the same crop. The prints side by side have the same quality, you wouldn't know one was taken with one camera or the other. While the CP5000 has the greater MP the D1H has the prime Nikon optics. The bottom line for me is, I can shoot with the CP5000 and know I'm going to capture the quality I require for my work in a tiny package. In Conclusion The Coolpix 5000 does a really outstanding job! Its small size that can easily be handheld in and of itself makes it the Coolpix to own. It's ease of operation, tons of functions and options and finally its image quality make it the perfect camera for the digital photographer! David adds--I was shooting with Moose while he took some of these images. I had my D1X with a Nikon 24-85mm lens--one of my personal lightweight favorites. I started to post the images I took of the same Chinatown scenes, but frankly on the web you definitely can't see any difference. The CP5000 nailed the exposure and picked up the needed overall dynamic and tonal range. Obviously that isn't to say that I'm giving up my D1X & D1H, any more than Moose is giving up his D1H, but it shows that for straightforward shooting the CP5000 can hold its own. There have certainly also been various issues reported with using the internal flash. Moose points out some of the problems above. Assume you'll want to have an external flash if you plan on doing any serious indoor shooting. You'll also want to make sure you hold the camera with your fingers out of the way of the flash sensor. |
Ads by Searchfeed
|
|||||||||||||||||||||
All contents copyright Pro Shooters LLC. All rights reserved.
Nikon is a trademark of Nikon Corporation.
nikondigital.org is not affiliated with Nikon Corporation.
nikondigital.org