Digital info for serious
shooters: specializing in Nikon & Canon
|
|
|
|
Colorvision has changed all that with this week's release of PrintFIX PRO. PrintFIX PRO, including the needed measuring device (technically the Datacolor 1005 Spectrocolorimeter), is aggressively priced at $499 or $599 for the Suite version which includes monitor profiling. Powerful and Versatile
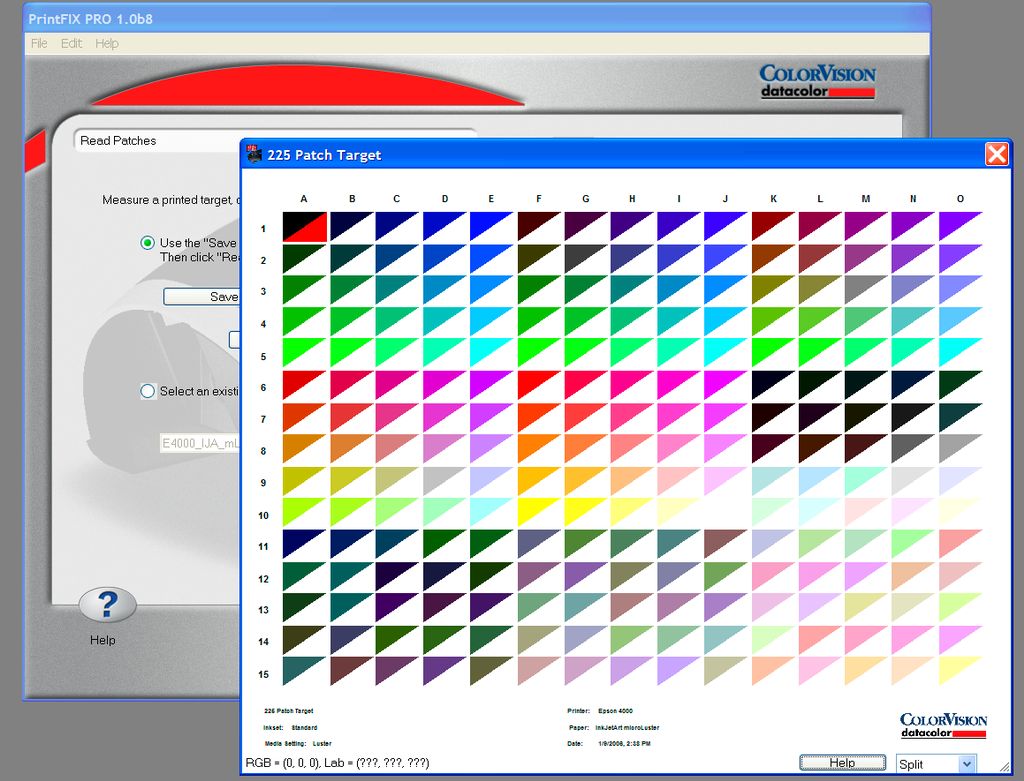
Using PrintFIX PRO: The Wizard InterfaceThe first thing you notice about PrintFIX PRO is that the interface is a "no-brainer" wizard. Thanks to extensive beta testing and a relentless drive to make the product simple, it is the easiest to use profiling package we've ever tested here. The wizard walks you through ensuring your printer settings are correct, printing test image to ensure your printer is operating correctly and your media type is set correctly and then finally printing the test target. One nice feature of PrintFIX PRO is that each test target you print has all the relevant information printed along with it. If you do any extensive amount of experimenting with ICC profiles you can easily wind up with a whole stack of targets on slightly different papers or with slightly different settings so it is great to have them all pre-labeled for you.
ProfilesPrintFIX PRO produces RGB-based ICC profiles. It can't be used to produce CMYK profiles, but that isn't an issue for most photographers profiling their own inkjet printers or even profiling the printers you might send an image to at your digital lab. You can create either standard 8-bit profiles or 16-bit per channel "high-bit" profiles for optimum accuracy. The 16-bit profiles are quite large though.
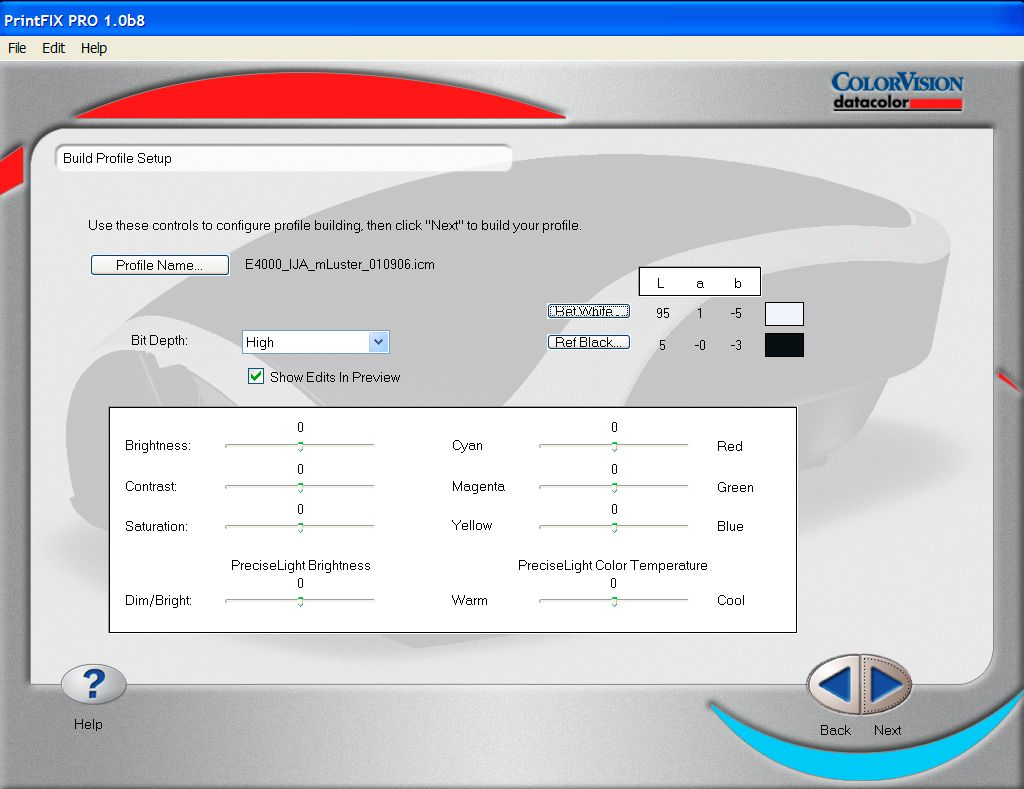
In particular I like that you can adjust for the brightness of the viewing conditions right in the profile customization screen. Often I wind up adding a quick Curves layer in Photoshop to my images to mimic this behavior, but generating a separate profile simplifies my workflow.
Rendering IntentsColorvision recommends the Saturation intent for most purposes, but since historically I've had best results with my desktop Epsons using Relative Colorimetric I used both intents and found them both excellent and virtually indistinguisable for many of my images when printing to the Epson 4000. Presumably that is because the Epson has sufficient gamut to handle the images in question more or less "as is" without a lot of gamut mapping. But you should certainly experiment with both rendering intents and may choose different ones for different images. In some cases I found that I didn't like what the Saturation intent did to dark reds in my desert images so I've settled on just using Relative Colorimetric for my E4000 images. Deciding if you need a Printer Profiling PackageWhen color printers were first available the provided drivers and profiles (if any) were downright awful when it came to producing accurate color. But as competition has heated up and the printer manufacturers have become more color savvy, their free profiles have improved dramatically. Now, if you are happy using inks and paper from your printer manufacturer you can quite likely find a profile that will work for you for free. But if you want to use other inks or papers to save money or achieve some different effects, then you're on your own and need to generate a profile. What makes PrintFIX PRO different?Most printer profile packages are either very expensive and require equally expensive hardware or are low cost and either use your scanner or an inexpensive colorimeter and have only provided mediocre profiles. The expensive packages do a great job but can cost many thousands of dollars. The inexpensive packages are better than not using a profile but as printer vendors have started supplying reasonable profiles for their printers and papers the inexpensive packages don't really add much value anymore. PrintFIX PRO provides an impressive middle ground. By providing a relatively low cost dedicated hardware device to measure the patches on your printed target and relying on their volume distribution to lower the price of the software Colorvision has provided a high quality printer profiling package for only $499 including hardware. The hardware provided with PrintFIX PRO is also unique. Low-end profiling packages have traditionally relied on your scanner to read back test patches. This can be very inaccurate and means that your printer profile is at best as good as your scanner. Plus your scanner isn't really built to read printer test targets, so these packages are not really that useful. Expensive packages have used a full spectrum spectrophotometer (which can measure the radiation at each frequency separately). PrintFIX PRO uses a "Spectrocolorimeter" which measure the light in 6 different bands which result in accurate measurements. This makes for more accurate profiles with tricky inks and papers in particular. PrintFIX PRO is quite a bit different than Printfix. It is a stand-alone application (not a Photoshop plug-in), with a new measuring device & is much more powerful and versatile. Many people had issues getting Printfix to generate good profiles. I'd suggest viewing PrintFIX PRO as a new product, because it is, and not let historical experience worry you too much. Note that there is also a Printfix Plus which works without the measuring device, but I didn't try to use the product in that mode.
The Bottom LineComparing PrintFIX PRO profiles with stock profiles shows that it can improve your profiles and therefore your printing results. And of course if you need to use non-standard inks or papers you'll want you're own profile creation tool to get the most out of them (or you'll need to purchase custom profiles for each combination). When I compared the results from PrintFIX PRO profiles to those I generated with Gretag ProfileMaker 4.1 and an Eye-One (a combination costing several times as much) the results were very close. With some of the desert images I used for the test, for example, I preferred the mid-tone color rendition of the PrintFIX PRO output and in other cases I preferred the color preservation in the shadows of ProfileMaker. That is quite a tribute to PrintFIX PRO, as it is the only sub $1000 package I've ever tested which can really go toe to toe with one of the high-end packages. As always, we'd love to hear your thoughts and experiences with PrintFIX PRO or other profiling solutions in our Color and Printing forum. --David Cardinal, Editor, DigitalPro Shooter
|
|
||||||||||||||
|
|||||
All contents copyright Pro Shooters LLC. All rights reserved.
Nikon is a trademark of Nikon Corporation.
nikondigital.org is not affiliated with Nikon Corporation.
nikondigital.org

 Hunting Leopard
Okavango Delta, Botswana
Nikon D2H, 70-200mm AF-S/VR
Hunting Leopard
Okavango Delta, Botswana
Nikon D2H, 70-200mm AF-S/VR  Datacolor Spectrocolorimeter
measuring a PrintFIX PRO target
Datacolor Spectrocolorimeter
measuring a PrintFIX PRO target